Welcome!

If you are looking for Willow Farm Apparel's T-shirts, please see the tab on the left labeled "Willow Farm Apparel". Do not hesitate to contact me with any questions or requests. Thank you for your support!

Showing posts with label Recipes. Show all posts

Thursday, April 5, 2012

Crockpot Lard

We just bought 1/2 a pig from a farmer down the road. (he is who we will buy our piglets from when we are ready to raise piglets- hopefully next year). We are now enjoying what Michael calls "the best sausage I've ever had." Elle requests it every morning for breakfast. And I made incredible (if I do say so myself) pulled pork sandwiches the other night for dinner. It is so nice to enjoy quality meat, that we know where it came from, how it was treated, what it was fed and how it was processed. (we had our sausage made with NO MSG- so nice to get to choose.)

Here is how to easily render lard in a crockpot. I got the directions from Sheri at Polyface Farm.


Fill the crockpot with the pig fat. Put it on low for about 12-13 hours.... depends on how much fat you have in there, how big your crockpot is,etc... mine is pretty big and I had a lot of fat in it. I could have probably cooked it longer, but I was trying to time getting another batch in and done at a time I could take care of it (ie: not in the middle of the night.) I started the first batch about 9pm, it cooked the hole night and I put it up in the morning about 9:30 and immediately started the rest of the fat I had and put it up at about 9:30 that night.

I won't lie, it is abit nasty. this is what was left after I cooked it down. I disgarded, but could have made cracklings with them on the stove.

I strained it with cheese cloth when I poured it all into a pot. Then I folded cheese cloth again, times 4 and used a rubber band to hold it around a wide mouth mason jar and used a liquid measuring cup to scoop from the once filtered pan into the mason jar- being filtered through the cheese cloth again.

That's it! This photo is when it is still hot, I ended up with about 3 jars, put them in the fridge and they will turn white as they cool. They will last almost indefinately, are great for pie crusts, cookies, green beans, frying anything etc... It has gotten a bad rep, but is actually really good for you... especially compared to shortening. I must say it also worked really well to oil my wood counter tops! I spilled some on there and just decided to use a paper towel and rub it all around, and it sealed it real nice and gave it a good shine. The wood really soaked it up.
This method was SO easy! Literally 5-8 minutes of my time.

Thursday, March 8, 2012

Yummy Frozen Yogurt Bites!

I found this idea on pinterest.com (how did I only discover that site a month ago!?-amazing ideas on there!) Theirs didn't have sprinkles, but I figured that would be a good addition and of course my kids love to spinkle. =)
Take yogurt and scoop some in a sandwich bag (or any bag) and cut a SMALL hole in the corner. Sqeeze out the drops like you would frost a cake with a frosting bag. Then we sprinkled sprinkles on them and put the tray in the freezor. After a few hours they are frozen and we scrap them off and they are yummy little frozen treats!

This was the first batch we did. The hole in the bag was too big and Elle was the one squeezeing these drops.

Of course there are many variations one could do... maybe a chocolate chip on each, maybe a slice of strawberry, or a blueberry, or blackberry... yum, I think I'll go try those.... =)

Friday, May 27, 2011

My latest favorite summer treat!

I had these at my friends place on my visit home. LOVED them! I made them today for lunch. Her's were better... I think my tomato's were too thick... but still so delicious!

It's a sliced baggett (spelling?!) with motzerella cheese, tomato sliced with fresh cut basil and a little bit of olive oil drizzeled on top. It is so fresh, healthy an great texture variations. Very "summery" tasteing. I also love the fact that when back home I will be able to make these from everything we grow (we plan to get a jersey cow for milk) except the bread.

Wednesday, February 16, 2011

Homemade soup from homemade chicken broth


Yummy, healthy soup for the season.
This is the only photo I got as I didn't think to take one while making it. I used the vegetable/chicken broth I made yesturday. I used a regular sized saucepan, filled it about 1/2 full of the broth, added 3 medium sized quartered yukon gold potatoes, 3 carrots cut in thirds, 1 sliced small onion, and about a cup of frozen sweet corn. I brought it to a boil and then turned heat down to low and cooked for nearly an hour. Dumped it all in the blender, added about 1/3 Cup shredded cheese (that was all we had, or I would have used more) and blended it (as shown above). It made a DELICIOUS creamy soup. The kids both loved it. They cleaned their bowls. I just used the vegetables we had, I had planned to throw in brocolli too, but didn't have any. Yum!

Tuesday, February 15, 2011

Homemade Chicken and Vegetable Broth

It has been weird to not have any animals here. I had no idea how much food scraps the dog and chickens ate back home! I started saving all of my vegetable cuttings, like the ends of carrots, brocolli stems, celery base, etc... in freezer bags in the freezer and just kept adding to it for about a month with the plan to make vegetable broth with it. Then I got a chicken back from Sea Breeze Farms (which is basically just what is left of a chicken once it's breasts, thighs and legs have been cut out to sell separately), so I decided to throw that in too. I didn't have any seasonings so I didn't add any, but I would have at least put in Bay Leaves if I did it again. But it tastes great.... smell's DELICOUS! And it was so nice to make use out of vegetable scraps that would have otherwise been thrown away.

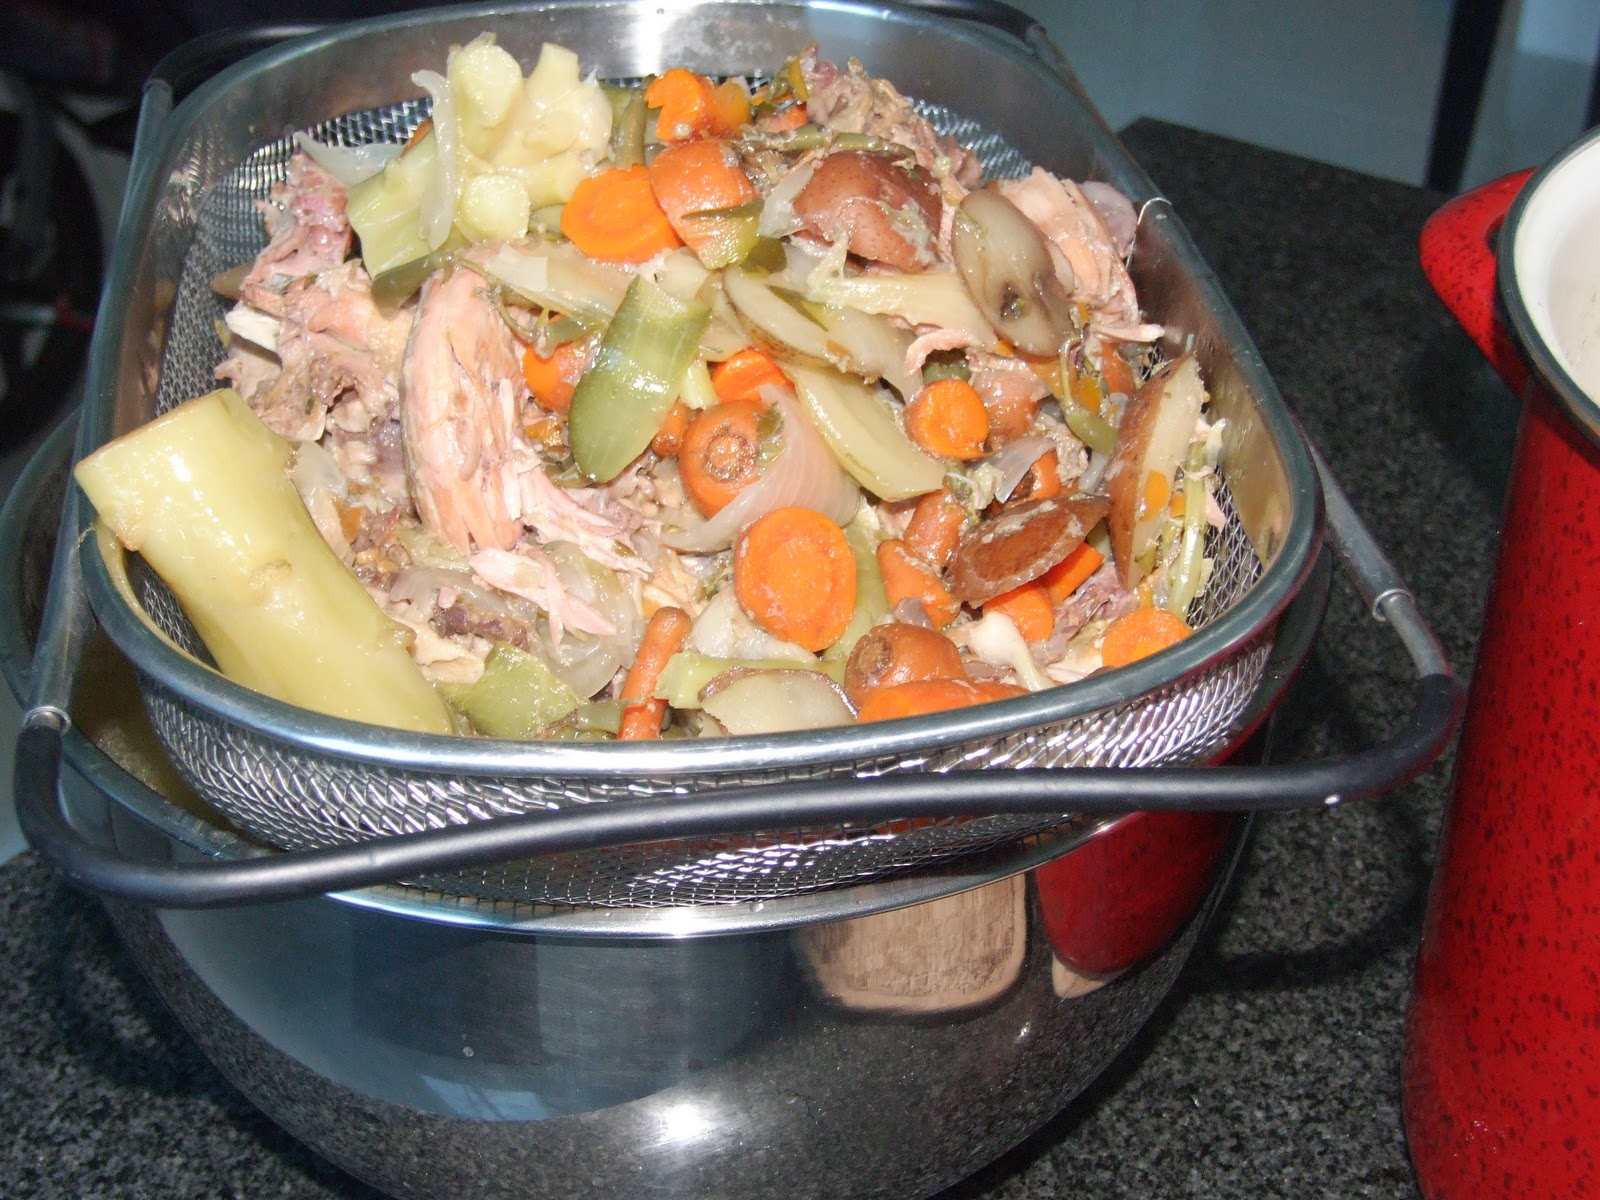
I filled this pot about half full of water, brought it to a boil and threw all the vegi scraps and chicken back in. I turned the temp to low and cooked it for about 6 hours. (I read you want to do it for at least 4). 


Then I placed a strainer over a large stainless steel bowl and scooped it all out and poured into that, straining all the solids.


It has nice deep color, full of all the nutrients from many vegetables and the chicken, smells incredible and tastes delicious... I added some salt after- which maybe I would add during the cooking process next time- I had no idea how much they must salt the store bought broth to get it to taste as salty as it does. This was not salty at all... so salt to your preferred taste.
I would have loved to pour this into Mason canning jars to store, but I can't find a store here that sells them, so I just poured it back into the big pot and put it in the fridge. I will use as much as I can in my cooking in the next three days and then freeze the rest. I read that it will keep in the fridge for 5-7 days and can be in the freezer about 3 months or longer. A great idea I came accross was to let it cool and then pour it into ice cube trays to freeze that way, then once frozen you could put them in a bag and easilly just grab a few for a recipe...
Super easy, smell was heaven, tastes delicious and perfect for the season... even if we are in Miami...

Thursday, February 3, 2011

Oregon Trail Sourdough Starter

Oregon Trail Sourdough Bread


I sent a self addressed stamped envelope to:
Oregon Trail Sourdough
P. O. Box 321
Jefferson, MD 21755 USA

and they sent me starter that originated along the Oregon Trail. Click HERE to access website with more information. It is a really special history they are preserving. And the bread is delicious. =)

Thursday, January 6, 2011

Homemade Candied Pecans

I found this recipe at http://www.allrecipes.com/. I got the raw pecans from my beloved Sea Breeze Farm (up north from Miami about 2 hours, but delivers down here every other week).

Ingredients:
1 egg white
1/2 Cup packed brown sugar
1 dash vanilla extract
4 Cups of pecans

Directions:
1. Preheat oven to 275 degrees. Line cookie sheet with parchment paper. Spray paper with cooking spray.
2. Beat egg white until stiff. Add brown sugar and vanilla. Stir until smooth. Mix in pecans and stir unitl coated. Pour the nuts onto the cookie sheet. (spread out to make one layer of nuts)
3. Bake until browned, about 10-15 minutes (mine took a little over 15 minutes)

SO good! The kids love them, they are great in salads or with chopped up apples and other fruit. I am excited to try this with the walnuts from our walnut tree back home.

Sunday, December 19, 2010

Useful Kitchen Tips

I am copying this from the Jan/Feb 2011 Coutryside and small stock journal...thought it might be useful for some of you.
"1. Minor Cuts: Apply ground black pepper to stop bleeding. No, it won't sting.
2. Burns: Immediately apply ice wrapped in damp cloth until the pain stops. It may take hours, but there will be no scar.
3. Warts: Make a paste by mixing baking soda with spirits of camphor in a capped container. Apply paste to wart every night and cover with bandage. Remove bandage in the morning. This method also works on stubborn plantar warts on bottom of feet. Here, you may have to use bunion relief pads to relieve pressure. Also shave down top of wart with razor blade to reduce pressure. This works when all else fails, e.g. acid, burn, freeze, radiation, and X-rays. If paste container dries out, add a little bit of rubbing alcohol to paste.
4. Eating raw, cruciferous veggies (Bok Choy, broccoli, Brussel sprouts, cabbage, cauliflower, kale, or radish), are bad fr your thyroid gland. Only eat these veggies if they are steamed or cooked.
5. Commercial potatoes are sprayed with a (poisonous) sprouting inhibitor. Peel potatoes before cooking then. Cooking with peels on forces poison into potato's flesh. Ditto for French Fries. Don't eat them unless you grow your own potatoes.
6. A cucumber's skin is mildly poisonous and its pointed seeds will irritate gastro-intestinal tract. Peel and seed before eating cucumbers.
7. All parts of deadly nightshade plants (except the edible fruit) are poisonous. This group includes egg plant, okra, bell pepper, potato and tomato.
8. The green parts of are poisonous. Cut off all green parts, no not eat them.
9. Vinegar will keep you from getting food poisoning. Start meal with a salad drenched in vinegar-based dressing or carry a small flask of vinegar with you to add to your drinking water. Sip from glass during meal. Vinegar is anti-bacterial, anti-fungal, and anti-viral.
10. Lavendar or hops smell will help you sleep better.
11. Treat "garlic breath" with whole milk (not skim milk)."

Interesting and hopefully useful for someone reading this.

Wednesday, December 8, 2010

Pumpkin Spice Homemade Bagels

I finally was able to find the needed spices to make these bagels. I had hoped to make them a while ago but Allspice and and ground cloves were next to impossible to find here in Miami... Here is the magazine I got the recipe from...

I totally messed up the recipe. Elle was helping me and I didn't notice that I had her put in a cup and 2/3 water, when I only needed 2/3's of a Cup! I was so lost as to why I kept needin to add a bunch more flour than the recipe called for...and they were still so sticky.... But all that being said, they turned out tasteing really good and if nothing else, they made our condo smell DELICIOUS! =) So I still thought I'd share the recipe because it is great to know how to make your own bagels and they are sort of festive.


Let's just notice... these are mine finished....
 Let's see that photo again...
Here is what they are suppose to look like....

Mine are deflated bagel pancakes! =) But YUMMY nonetheless... =)

Here's the recipe... The magazine had it for a bread machine or not and canned pumpkin, but I will show how to do it without a bread machine and I used fresh pumpkin... which I have never done before... Baked pumkin seeds are really good!

Ingrediants:

2/3 Cup water (110-115 degrees for the yeast)- This is where I went wrong!
3/4 Cup fresh pumpkin, or 1/2 Cup canned pumpkin
1/3 Cup Packed Brown Sugar
1 tsp. salt
1 1/2 tsp. ground cinnamon
3/4 tsp. nutmeg
1/2 tsp allspice
1/2 tsp. ground cloves
3 Cups Bread Flour
1 Package active dry yeast
1 egg white
1 Tbsp. Cornmeal (I didn't have this-therefore, didn't use it...)

Directions:
1. In a large bowl dissolve yeast in 2/3 Cup water.
2. Add the pumpkin, brown sugar, salt, cinnamon, nutmeg, allspice and cloves. Mix well.
3. Stir in enough flour to form a soft dough.
4. Turn out onto a lightly floured surface; knead until smooth and elastic, about 6-8 minutes.
5. Place in a bowl coated with cooking spray, turning once to coat the top. Cover and let rise in a warm place until doubled, about 1 hour.
6. Punch dough down and shape into balls with a whole in the middle- see photo above with the flour on the counter... mine were so sticky, this was tough to make "pretty".
7. Bring water to boiling in a large pot (about 3-4 inches of water in there). Place 2 bagels at a time in the boiling water for 45 seconds and then turn them over and leave for another 45 seconds.
8. Remove the bagels from the water and allow to dry on a paper towel.
9. Wisk egg white and brush over the bagels. Coat cooking sheet with cooking spray and sprinkle with cornmeal (I didn't do that). Place bagels 2 inches appart and bake at 400 degrees for 15-20 minutes or until golden brown. Cool on wire racks.

The smell alone is worth it.... mmmmmmmmmm

Tuesday, December 7, 2010

Forgotten Dream Cookies

These are my favorite cookies. They were a recipe of my grandma's that I remember helping my mom make as a child.

They are super SWEET...which is of course why they are my favorite...
Here's the recipe:

2 egg whites
1/8 teaspoon salt
1/2 teaspoon cream of tartar
1/2 Cup sugar
1/2 teaspoon vanilla
6 oz. chocolate chips (I use a bit more)

With beater, beat egg whites until foamy. Add salt and cream of tarter. Beat until whites form stiff peaks. (make sure to really beat them..don't rush this phase) Add sugar gradually while beating. Beat in vanilla. Fold in chocolate chips. Drop teaspoonfuls on greased cookie sheet. Put in preheated 350 degree oven. Turn oven OFF and leave them in there for at least 3 hours or overnight.
They should be crunchy and airy. If they are too sticky or gooey, then you may not have beat the whites long enough.

Saturday, December 4, 2010

Render your own LARD!

I know, I know... "Lard" sounds disgusting and HORRIBLE for you.... well I was certainly suprised to learn that is is actually considered FAR better for you than shortening (think Cristco). It has a great deal of Vitamin D in it, (which is especially important for people in often cloudy areas like western Washington) and it is considered to be the closest type of fat to what our own bodies have and therefore our bodies know what to do with it. Also, for anyone curious, here is the USDA's fatty acid breakdown for 1 Tablespoon of lard verses one Tablespoon of butter:

Lard: 1.4g polyunsaturated; 5.8g monounsaturated (think Olive Oil type fat); 5g saturated.
Butter: 0.4g polyunsaturated; 3g monounsaturated; 7.3g saturated.

So for those that are "against" saturated fats...lard has less...

 I love flaky pie crusts and don't want to give those up, but the only flaky pie crusts I have had success with are made with shortening (Crisco). I think Crisco is one of the most unhealthy things out there, so I started researched what else will make a flaky pie crust and found that lard (which of course is what many of our grandmothers, or great grandmothers used when there was no "Crisco") is suppose to produce an even superior crust! So I was excited to say the least that it is also healthier for us. So let's just "get over" the stigma attached. I challenge you to research how they make Crisco and then tell me lard is "bad for you" or gross...

Anyway...

I searched high and low for  "leaf lard" (soft creamy fat from around the pig's kidneys) as it is suppose to be ideal for pastries and pie crusts. I was not able to find it here in Miami.... can't wait to just get it from our own pigs... so I settled with pig back fat, with is still suppose to be remarkable... everything I read agreed it makes excellent Mexican food, green beans, corn bread, etc.. and of course anything you want to fry. Also, I took two separate drainings from the pan. The first was earlier on in the cooking process and is supposedly better for pastries and pie crusts and the later will have a little "porkie" flavor to it and is better for other uses.
Here is the pig fat I got from my new favorite food source. Sea Breeze Farms- It's over 2 hours north of Miami, but they deliver down here every two weeks. I wanted fat from a grass fed, no hormone fed, no antibiotics pig. (more on Sea Breeze Farms in a future post) I think these things are important as often the chemicals/drugs/hormones settles in the fat of  animals and so I wanted something without all that. Lard you can buy at the store is NOT the same.. it is partially hydrogenated to give it uniform texture and longer shelf life...and more than likely it is made from factory raised hogs fed all kinds of nasty stuff.

First cut up the fat. The smaller the peices, the faster it will cook...

Turn the burner to med-low. If anything you want it lower. If you cook it too hot than it will taste "porkie". Put a small ammount of water in the bottom of the pan (I was cooking 2 lbs of fat and put about 1/4 cup of water in the pan). And then put the fat cubes in.

When the peices start to float to the top (after about 20-30 minutes..maybe longer if you are cooking on real low heat). Drain your first "juices" . I put a peice of cheese cloth over the jar to strain out any small peices from dropping in. Then put back on the stove to continue cooking.

Stir every once in a while... and WATCH OUT, once they get going they really pop and splatter. This is why I used this big pot for such a small batch. It really contained it well, but if you are using a smaller pan or doing a large batch wear an apron if you care about your clothes, keep kids back and watch out! =)

This is what it looks like when it is nearly done. The fat peices are floating- this is how they make Pork Rinds. (is that how you spell it!? I have never eaten them, but Michael loves them and I am saving these for him. I guess they are good in other things too and there are many recipes out there for their use). This is after about 45min-an hour  or about 20-30 minutes after the first draining. Also- you don't HAVE to do a first draining, I just did because I wanted some for pie crust making. Which you really could use the end stuff for too, it just might taste a little different.

I couldn't get my pictures arranged in order for some reason, but here is the 2nd draining.

The second draining is on the left, the first on the right. The first is lighter in color.

Here is the first draining up close. Much lighter than the second.
Here they are in the fridge after about 2 1/2 hours. They have cooled and "solidfied" and are ready for use.
Everything I read says it freezes well or you can can it with sealed lid and store it for a LONG LONG time, I didn't mess with that as I plan to use mine this next week and I only did a small amount. PLUS... Get this... I can NOT find canning jars anywhere in Miami!!! No joke... not even Wal Mart has them!! I had brought these from home, but I had no lids for them... Seriously.... NO canning jars or lids that I can find... I will keep looking...people sort of look at me sideways when I ask at the stores if they carry them...

This was a very simple process... some sources said it makes the house smell and to open windows and doors when you do it. Others stated that the smell is only there if you are cooking it too hot or possibly using not very good pig fat... there will be a slight smell... you are cooking animal fat... but it shouldn't be bad at all. Mine did not smell hardley at all.  
If you can't find a farmer to buy pig fat from, you should be able to get some from a butcher, but I would reccomend learning about the living conditions of the pig it is coming from. 
I will let you know how my pie crust turns out! =)  

Monday, November 29, 2010

Homemade sweet popcorn

I made this last night (I failed to take any photo's) and it is SO yummy, so I thought I'd share...

1/4 Cup Vegetable Oil
3/4 Cup Yellow Popcorn Kernels
2 Tablespoons Granulated Sugar
3 Tablespoons of unsalted butter melted
Sea salt to taste

Put Oil and 1 (yes 1) kernel into a 6-8 Quart pot. Cover with lid. Set over high  heat. Stay near by so you can hear when that one kernel pops. When it does add the rest of the kernels and sprinkle the sugar on tp. Cover with the lid and shake the pot over the burner to spread the sugar. Shake once or twice more until the popping starts and then shake constantly until the popping slows down considerably...this takes no time at all... a couple minutes or so at most.
Put the popcorn in a bowl and drizzle the butter over it and add salt to taste.

Wednesday, November 24, 2010

Homemade Soft Pretzels

On parchment paper before going into boiling water

Boiling,

draining

Salted... no very good with the sprinkling! I don't even have Elle to blame on this.. that was me...


I got this recipe out of a magazine- Grit Country Skills Series- Guide to Homemade bread.

1 1/2 Cups warm water
2 1/2 teaspoons active dry yeast
1 Tablespoon Sugar
3 1/2 Cups all-purpose flour
1 Tablespoon salt
1 egg
Coarse or Kosher salt

Water bath consists of: about a gallon of water and 1 Tablespoon Baking soda

1. In large bowl, combine warm water, yeast and sugar; let sit for 5 minutes, or until foamy.
2. In separate bowl, combine flour and salt. Add to yeast mixture and mix until it comes together. Use your hands to combine into a ball. On lighly floured work surface, knead dough for a few minutes until a smooth, sticky dough forms.
3. Place dough in oiled bowl and cover with plastic wrap. Let sit for about 45 minutes.
4. On lightly floured work surface, divide dough into 8 equal pieces. Roll each peice into a long rope, 18-20 inches long. (Don't over flour your hands or work surface as this will make the pieces more difficult to roll.) Twist each peice into a pretzell shape by placing the arc of the pretzel at the bottom (closest to you). Round the two ends so they're facing the arc and twist them around;"paste" them to opposite sides of the arc, using a little water, if necessary. Place on baking sheet covered with parchment paper.
5. Prepare water bath. (don't forget the baking soda!) Once boiling, use slotted spatula to trasnfer each pretzel into water and boil for 3 minutes (I did 4 at a time), flipping once halfway through. Drain on a cooling rack and transfer parboiled pretzels back to parchment-lined baking sheet.
6. Heat oven to 400 degrees. Brush egg wash (beat one egg with 1 tablespoon water) generously over each pretzel and sprinkle with coarse or kosher salt.
7. Bake for 25 minutes.

They are yummy! No quite Aunt Annies (my favorite kind!) or Weltzels but then again, they are not coated in butter (although you could), don't cost $5 each and you know exactly what is in them. I think I am going to try and add raisins and cinnamon to the dough next time I try them... and maybe make 10 instead of 8 with the dough so they are a little thinner. It was a fun one for Elle to help with- watching the yeast grow and get bubbly, working the dough, rolling them out, shapeing the pretzels and painting the egg wash on them.

Tuesday, November 23, 2010

Fun tip: How to make your own brown sugar

I didn't know this! Maybe it is common knowledge...but I still thought I wouldd post this because I think it's great to know and I had no clue; so maybe someone else has no clue too! =)

For every Cup of granulated sugar add 1Tablespoon of molasses for light brown sugar and 2 Tablespoons for dark brown sugar. Combine with electric mixer on medium-low to medium high speed (start slow and gradually increase speed) until the molasses is incorporated and the mixture becomes fluffy brown sugar....takes almost 10 minutes or so... you want all the molasses balls blended in.

That simple! How great if you are baking something and realize you're out of brown sugar- no trip to the store needed if you have granulated sugar and molasses on hand.

Monday, November 8, 2010

Cast Iron Skillet Steak

I never think food pictures look nearly as good as real life....maybe it's because you can't smell a photo...

I want to preface this post with the statement that I do not consider myself a very good cook. I haven't done it enough, I have always tended to just do what I knew and not really branch out much. I don't know the "rules" of cooking or the basic "ideas" or anything like that...I was just never taught it and haven't taken the time to learn them. But it is one of the things I am working on here in Miami... and tonight... tonight I really out did myself! =) The most incredible steak I have EVER had, sauteed mushrooms, and mashed potatoes/carrots.
I got the long wanted cast iron skillet here and have loved cooking with it... feels sort of old fashioned for some reason... I couldn't find a broiler pan at any store here (odd?! Target-no, Walmart-no, grocery store-no...) and we aren't allowed to have a BBQ at our condo so I had to figure out how to cook steak in my cast iron skillet. I looked at a number of websites and a couple food chat forums. There seemed to be quite a dispute between salting your steak first or not salting it first, but everyone agreed that upon removing it from the fridge, it needs to sit at room temperature for 30-40 minutes. (I never knew this). I decided to just salt my salt a little- with Coarse Kosher salt.- there was a consensus that table salt should NOT be used. I heated the oven to 500 degrees with the cast iron skillet in it. This oven here takes FOREVER to pre-heat so this took the full 40 minutes. In the mean time I cooked bacon until it was crispy and sliced some Monterrey Jack cheese.
 I also started the mushrooms. I used about 2 Tablespoons of butter, 1 Teaspoon of Olive Oil, 1/2 teaspoon of Balsamic Vinegaret (sp?), 2 cloved of garlic minced and 1/4 of an onion sliced, then added the mushrooms- about a Cup and a half... wasn't quite enough for 2 adults, I would do at least 2 Cups next time. I had these is a fry pan on the stove between medium and low- a little closer to medium.
Once the oven was preheated and that skillet was, literally, smoken hot- I brought it out and put it on an already HOT burner (burner on high, turned on about 2 minutes before putting pan on it) on the stove top and put the meat on there (by the way, this was new york strip steak, but I'm sure the same method would work with T bones or other kinds of steak). Everything I read told me not to move it once it was placed on there, the point is to sear the outside to hold the juices in. So after about 2 minutes (my steak was about an inch and a half thick) I flipped the steak and did another 2 minutes on the other side. Then I put the oven on Broil 500 degrees. (It was already so hot from heating the pan it didn't take any time to pre-heat) and put the pan with meat in the oven. I cooked EACH SIDE for about 4-5 minutes and this gave me a little more than medium well done... you would have to adjust your time based on how you like your meat and how thick your steak is. As soon as I pulled it out of the oven (and cut in to it to check that it was done to my liken) I put the slices of Monterry Jack cheese and bacon peices (that I had cooked and cut up earlier) on top so the cheese would melt. It was INCREDIBLE. I honestly do not have too much to compare it to, I don't normally order steak at resturants or anything, but it was JUICEY, not chewy, flavorful and in my humble opinion, tasted DELICIOUS.
The mushrooms were also remarkable, although I must admit I have only had sauteed mushrooms one other time in life and they were soggy, I liked these with a little firm texture still to them. (they took about 20 minutes on the stove top). REVISSION: I have had sauteed mushrooms another time... Shantrel mushrooms our friend, John, made us... THOSE were incredible... a completely different playing field, so they didn't even occur to me in thought about this... he sells to the local stores in Olympia, and all over Western Washington and does cooking samples for them... incredible...
Yummmmm...

Wednesday, November 3, 2010

veggie-speghetti

I love my new cast iron skillet! I made this for dinner in it last night. I have never made speghetti like this before but really liked it, so I thought I'd share. Here's what I used:
1 lb ground beef
1 Cup of sweet corn
1 Cup of diced green pepper
1 Cup of diced orange pepper
1 Cup of  sliced mushrooms
1 1/2 Cup of diced celery
1 jar of roasted garlic speghetti sauce
1/4 Cup of Sugar (I always put sugar in my speghetti...yumm...)

This is enough for about 6 adults, so adjust accordingly. I browned the meat first and then threw everything else in and cooked for about 15 minutes. The veggies were still real crunchy (which I like). You could cook those separate for a little bit if you wanted them softer. Or you could keep it on the oven on low for an hour or so and that would soften them. (Michael didn't get home for dinner until almost 2 hours after he thought so it simmered on the stove for him for a LONG time and his veggies were softer). So just cook your noodles and drain them, pour some of this on, add some parmasean  cheese and woo-la! =) It was really easy, pretty fast and a really good way to get a lot of veggie's in. I would have added black Olives too if I had had any. And I thought about carrots too, (didn't have any) maybe grated?... next time... Enjoy!

Wednesday, October 27, 2010

Homemade Cinnamon Rolls


I was itching to bake yesturday, to make something from scratch, to fill this foreign smelling condo with a "baking scent"...so Elle and I made Cinnamon Rolls. I have literally been to the grocery store 6 (yes, SIX) times since I have been here, and I have not even been here a week. It is amazing how many things you just have when you cook/bake often that lasts a while and you don't really consider often. Well, here I started with hardly anything- I brought along some recently purchased items from Azure Standard like organic flour, sugar and black beans- but other than that I mainly brought baby food and child's snaks. Every time I try and make a meal I find myself realizing I don't have a very basic ingrediant that I always would have had on hand back home.
Homemade meals really are cheaper than eating out (not to mention way healthier) all the time, but when you are starting with having to re-buy everything like baking soda, baking powder, powdered sugar, vanilla extract, spices, seasonings, etc... it gets spendy fast!
So Elle and I made these cinnamon rolls after carefully checking the ingrediants and going to to grocery store to get all that we needed. I put them in the fridge to chill overnight with the plan to get up an hour before Michael had to leave for work to set them out and cook them and put icing on them so they could enjoy them warm that morning.... As they were cooking, I began to make the icing (which had a separate ingrediants list)... and had no powdered sugar! It was 4:30 in the morning and no grocery store close enough to make it there and back in time, let alone worth risking who knows what being out in this area in the dark... so the kids and I had icingless cinnamon rolls this morning... but we made our 6th grocery run this afternoon and I got powdered sugar, so we'll try again tomorrow. =)

Here's the recipe: (altered from Better Home and Gardens Cook book)
Prep: 45 Minutes    Rise: 1 hour     Chill: 2-24 hours (or not at all)
Stand: 30 Minutes (if you choose to chill)   Bake: 20-25 minutes 
Oven: 375 degrees    Makes: 24 rolls

4 3/4-5 1/4 Cup of all-purpose flour                                      Vanilla Glaze:
1 package dry active yeast
1 Cup milk (I think whole milk works best)                           In a small bowl stir together 2 1/2 Cups
1/3 Cup butter                                                                        powdered sugar, 2 teaspoons light colored
1/2 Cup Granulated Sugar                                                      Olive Oil, 1/2 teaspoon Vanilla. Add
1/2 teaspoon Salt                                                                    enough half and half to reach drizzeling
3 eggs                                                                                      consistancy. (about 2-4 Tablespoons)
1 Cup packed Brown Sugar
1/4 Cup all-purpose flour
1 1/4 Tablespoon Cinnamon
3/4 Cup butter
a few Tablespoons of half and half
1 recipe of Vanilla Glaze

Optional add ins:
Raisins, pecans, chocolate chips, peeled and diced apple chunks (I used these)

1. In a large mixing bowl combine 2 1/4 Cups of the flour and yeast. In a saucepan heat and stir milk, 1/3 Cup butter, granulated sugar, and salt just until warm (120-130 degrees F) and butter almost melts; add to flour mixture along with eggs. Beat with electric mixer (or a strong arm as I did...) on low speed for 30 seconds, scraping bowl. Beat on high speed 3 minutes. Stir in as mush of the remaining flour as you can.
2. Turn dough out onto a lightly floured surface. Knead in enough of the remaining flour to make a moderately soft dough that is smooth and elastic (about 3-5 minutes). Shape dough into a ball. Place in a greased bowl; turn one. Cover; let rise in a warm place until double (about an hour).
3. Punch dough down and turn out onto a lightly floured surface. Divide in  half. Cover; let rest for 10 minutes. Meanwhile, lightly grease two 9x1 1/2 inch round baking pans or 2 baking sheets; set aside. For filling, stir together brown sugar, the 1/4 C flour, and cinnamon; cut in 1/3 Cup butter until the mixture resembles coarse crumbs.
4. Roll each half of dough into a 12x8 inch rectangle. Using 1/2 of remaining butter on each rectangle, spread butter evenly over dough. Sprinkle filling over butter. If desired sprinkle any optional add on's at this time. Roll up each rectangle starting from a long side. Seal seams. Slice each roll into 12 peices. Place cut sides down in prepared pans or baking sheets.
5. Cover dough loosely with plastic wrap, leaving room for rolls to rise. Chill for 2-24 hours. Uncover; let stand at room tempature for 30 minutes. (Or, to bake rolls right away, don't chill the dough. Instead, cover loosely; let dough rise in a warm place undtil nearly double, about 30 minutes.)
6. Break any surface bubbles with a greased toothpick. Brush dough with half and half. Bake in oven at 375 degrees for 20-25 minutes or until light brown (you may want to cover the rolls with foil the last few minutes to prevent over browning). Remove from oven. Brush again with half and half. Cool for 1 minute. Drizzle with Vanilla Glaze. Serve warm.

Friday, October 1, 2010

Cinnamon Honey Butter

I got this off a friends BLOG who got it from THIS SITE - it is SO DELICIOUS!

 Ingrediants: 1 Cup (2 sticks) of Butter softened to room tempature-(important!), 1 Cup of Powdered Sugar, 1 Cup of Honey, and 2 Tablespoons of Cinnamon (I used 3).


Whip them together in the blender


Could make a great gift for Christmas! Or just really good to bring to this seasons parties with it's sort of "holiday taste".  Enjoy!